


The self-test detects HIV antibodies, which are what the body produces to defend itself against the virus. It does not detect the virus itself. Since the virus is not present in oral fluids, there is no risk of transmission through those fluids.
It can take up to 3 months (12 weeks) for the body to produce enough antibodies to be detected by the self-test. For that reason, the self-test should be used 12 weeks after a possible exposure to HIV.
Note: This test is designed to detect HIV only. It does not detect other STBBIs such as gonorrhea or syphilis.
The OraQuick self-test is done by swabbing the upper and lower gums with the flat pad of the test device, then waiting 20 minutes for the result. There are three main steps: getting ready, doing the test, and reading the result.
Keep reading for detailed instructions, or watch the short explanatory video produced by COCQ-SIDA.

Here are the steps to get ready:

Open the box and place all the items in front of you. The kit contains two pouches attached together.
The test and all of its components can be disposed of in a regular garbage bin.
On the test device, you will see two letters: C for Control, and T, for Test.
As with COVID-19 self-tests, a line must appear next to the C to show that the test worked properly.

Important: if you took the test less than 12 weeks after a possible exposure to HIV, a negative result does not necessarily mean that you do not have HIV. It may simply mean that the test could not yet detect the antibodies because they are still developing. In that case, you should repeat the test once the full 12 weeks have passed to confirm the negative result.

You must make an appointment for a standard blood test at a clinic to confirm the result.
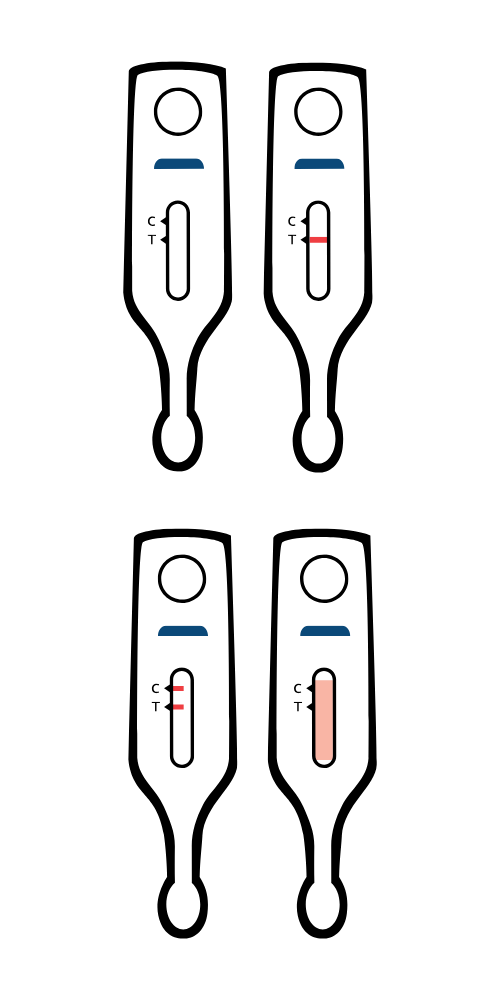 The test is invalid if:
An invalid result means the test did not work properly. The result cannot be interpreted, and you will need to repeat the test using a new kit. Do not reuse the same test.
OraQuick is intended for anyone who is HIV-negative and thinks they may have been exposed to HIV, EXCEPT:
You need to wait 12 weeks after a possible exposure to HIV before using the oral self-test if you want a reliable result.
The test detects the antibodies your immune system produces to fight the virus. However, it can take up to 12 weeks for those antibodies to build up to a level that can be detected by the self-test.
If you take the OraQuick self-test before the recommended 12 weeks and the result is negative, you should not consider that result final. You will need to repeat the test once the 12 weeks have passed for the result to be reliable.
If the result is positive, no matter when you took the test, you do not need to repeat the self-test. Instead, make an appointment with a healthcare professional for a confirmatory blood test.
Possible HIV exposures include:
anal, frontal, or vaginal sex without a condom with a partner living with HIV whose viral load is detectable, or with a partner whose HIV status is unknown;
sharing equipment used for drug injection.
One of the benefits of the HIV self-test is that you can choose how you want to do it: on your own, at home, with someone you trust, or with the support of a community worker.
A community worker can guide you through the process, help you interpret the result, and support you afterwards if needed.
Support options vary from one organization to another and may be available online, by text, by phone, or in person.
To find support near you, use the postal code search tool to locate the nearest community HIV resource.
The OraQuick oral HIV self-test was approved for use in Canada on February 10, 2026. At the moment, it can only be ordered in bulk, with a minimum order of 25 tests at a time. It may eventually become available for individual purchase or through certain community organizations.
The cost is 20 Canadian dollars (CAD) per test, plus taxes and shipping.
To order it, you need to complete an online form at reach4testing.com.
There is another type of HIV self-test: the INSTI blood self-test.
It involves analyzing a drop of blood and gives a result within one minute.
Learn more about the blood self-test.
Comparison table: INSTI blood HIV self-test vs. OraQuick oral HIV self-test
|
Blood (INSTI) |
Oral (OraQuick) |
|
|
Sample type |
Finger prick to collect a drop of blood |
Swab of the gums |
|
Time to get a result |
Less than 1 minute |
20 minutes |
|
What it detects |
HIV-1 and HIV-2 antibodies |
HIV-1 and HIV-2 antibodies |
|
Time between HIV exposure and possible detection |
Between 3 and 12 weeks (3 months) |
12 weeks (3 months) |
|
Cost |
$35 for one test, $55 for two tests, plus taxes and shipping |
$20 per test, plus taxes and shipping |
|
Storage temperature |
2-30 °C Use the test between 15 and 30 °C |
2-27 °C |
|
Where to get it |
Through the manufacturer’s website or through certain community organizations |
Online (minimum order of 25 tests) |
|
Results |
||
|
Positive |
Take a confirmatory test (standard blood test at a clinic) |
Take a confirmatory test (standard blood test at a clinic) |
|
Negative |
If needed, repeat the test 3 months after the possible exposure to HIV |
If needed, repeat the test 3 months after the possible exposure to HIV |
|
Invalid |
Repeat the test using a new kit |
Repeat the test using a new kit |
What should you do if the result is positive?
A positive HIV self-test result must always be confirmed with a standard blood test at a clinic. Check the map of testing locations to find a place near you.
Getting a positive result can be difficult, even though people can now live comfortably with HIV. If possible, reach out to someone you trust for support. You can also contact the community HIV organization nearest you for psychosocial support or help navigating the healthcare system.
While waiting for confirmation, choose with your partner or partners the most effective prevention methods to avoid possible transmission of the virus.